Slim Fit Wall Mount Installation Guide (Built-In)

Last Update date : Jun 04. 2026

Important Note: The information on this page is for Hong Kong products only. Models, sequences or settings will vary depending on location and/or where the product had been purchased. To be redirected to your local support page please click here.

A Samsung TV mounted on a white wall showing a snowy mountain scene at sunset.

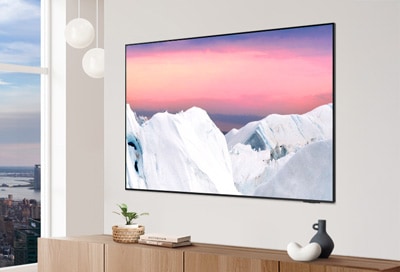
The Slim Fit Wall Mount secures your Samsung TV flush against the wall, creating a minimalist aesthetic. The design provides ample space for connecting essential cables and accessories for your viewing experience without compromising style.

Slim Fit Wall Mount Installation Guide (Built-In) Slim Fit Wall Mount Installation Guide (Built-In)
1 Place the TV on a protective cushion or a flat surface, such as the floor or a table.
WallMountBuiltin1
2 Attach the protective stickers to the upper back of the TV with the arrows facing inwards.
WallMountBuiltin2

Note: For OLED models, attach them to the lower back of the TV.

WallMountBuiltin3
WallMountBuiltin4
3 Make sure to check the L/R markings to avoid switching the left and right sides.
Use the screws to attach the hanging brackets to the back of the TV.
WallMountBuiltin5
WallMountBuiltin6
WallMountBuiltin7
WallMountBuiltin8
WallMountBuiltin9
WallMountBuiltin10
4 Attach the protective pads 10mm below the top edge of the TV.
WallMountBuiltin11
5 Make sure to connect the power, antenna, network, and optical cable first for OLED models.
WallMountBuiltin12
WallMountBuiltin13
WallMountBuiltin14
WallMountBuiltin15
WallMountBuiltin16
WallMountBuiltin17
6 Measure the spacing ⓐ, and align the templates along the guiding lines and attach them with an overlap to fit the measured ⓐ.
WallMountBuiltin18
WallMountBuiltin19
WallMountBuiltin20
WallMountBuiltin21
WallMountBuiltin22
WallMountBuiltin23
7 Find the ideal spot for your TV, and tape the template to the wall where the TV will hang.
WallMountBuiltin24
WallMountBuiltin25
WallMountBuiltin26
8 Use a pencil to mark where you'll be drilling in the template.
Each bracket requires 3 pilot hole marks.
WallMountBuiltin27
9 Mark fixed positions on two of the three with ★, and mark a desired position for the remaining one among those marked with ▲ according to the installation environment.
WallMountBuiltin28
WallMountBuiltin29
10 Ensure the hole marks on the left and right sides are aligned horizontally before removing the templates.
WallMountBuiltin30
WallMountBuiltin31
11 Attach the mounting brackets to the wall by inserting the screws into the marked locations. Ensure the brackets are correctly positioned. Do not switch left and right.
WallMountBuiltin32
WallMountBuiltin33
WallMountBuiltin34
WallMountBuiltin35
12 Please have at least 2 people lift the TV simultaneously when installing it.
WallMountBuiltin36
WallMountBuiltin37
WallMountBuiltin38
13 Make sure that the TV is securely attached to the bracket.
WallMountBuiltin39

Good to Know

  • Check the wall type before installing.
  • Always consult an expert for installing on a drywall, Sheetrock, or gypsum board.
  • Do not fix it to drywall without any reinforcement.
  • Be sure to check the location of wooden studs in the wall before drilling holes and installing screws.
  • Minimum wood stud size: 51 x 102 mm (2 x 4 in).
    Drill holes (3 mm/ 1/8th in wide) first before installing screws.
  • A standard stud distance is supported. (16", 18", 24") 
  • Screw holes must be drilled in the center of studs. 
  • Studs can split when you attach the TV to the wall mount
    if the holes were not made in the center of each stud. 
  • To separate the TV from the wall mount, first disconnect the cables before lifting up the TV.
    Ensure that the TV is lifted up by at least two persons.

If the above information does not match what your product is showing, you may check the User Manual for your product. If you are unable to solve the problem, please contact us for further assistance.

Thank you for your feedback!

RC01_Static Content : This text is only displayed on the editor page